Configuring the User Profile Synchronization Service in SharePoint 2010 - Step by Step
First of all you must be a farm account to do all this configration and SharePoint is not a stand-alone installation (See msdn). I had also problems with FQDNs when I installed SharePoint. Don't use FQNs like sp2010.domserver.com when you setup SharePoint. Lastly there is a bug in the creation of the Sync DB which will prevent the UPS provisioning from succeeding. Before we start UPS we must fix this up. (see Powershell bug)
! (Update October 2010) DO NOT INSTALL THE OCTOBER 2010 CUMULATIVE UPDATE for SharePoint Server or Project Server !! It kills the UPS .
General Knowledge
The Profile Synchronization Service, short UPS, is a new sharepoint service within the new Service Oriented Architecture (SOA) of SharePoint. It is a wrapper around Forefront Identity Manager (FIM) services—two Windows services that are installed (but initially set to “disabled”) on each server in the farm. But don't start these services manually. The UPS starts them, when you correctly installed the UPS on SharePoint.1. Check your services
First check if you already have a "User Profile Service Application". To check that go to your Central Administration -> Application Management -> Manage Service Applications.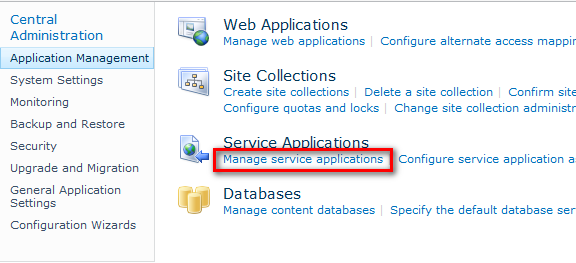
if you already have a service installed go on with step 3 else go ahead.
2. Create a new User Profile Service Application
If you don't have a such service than you have to create one. Click on "New" in the ribbon and select "User Profile Service Application".
Enter all the infos needed for the profile service. The one important things here are the security account for this application pool and the name of the service. The user should be a farm admin and should have the rights to logon into the server where the AD sits. As service name you should pick here a name different than a used one. I read in other blogs that this could make problems (see paulgrimley).
 |
| Create a new user profile service application |
3. Put your account to the local admin group
The Setup account for the service must also be a member of the Administrators group on the server where the User Profile Synchronization service is deployed. I read in other blogs that you shoul reboot the server when you do that. SharePoint caches user accounts probably an iisreset and a timer reset should also work.
 |
| Add account to local admin group |
After the service has started, you can remove the account from the group.
4. Create an account with Replicate Directory Changes on the domain
To sync the AD and you Profile Store you'll need a special sync account e.g. "sp_sync", that must also have the permission "Replicate Directory Changes" on the Domain Controller (See "How to set Replication Directory Changes"). The links above describe exactly how you can do that. This property must be set on the active directory domain.5. Start the Service
Go back to the Central Administration -> Application Management -> Manage Services on server and start both the "User Profile" and the "User Profile Synchronization Service". It takes about 10 minutes to start the service, so be patient. Refresh the page in intervalls to see if the services have started.
 |
| Start User Profile Services |
When the User Profile Synchronization Service has started check the "Services" if the both Forefront services are enabled. Do an IIISRSET if the Service is on the same server as the application server.

After all the changes I had the problem, that I could not open the settings for the "User profile synchronization service". After searching a while I found that the application pool of the "SharePoint Web Services Root" was stopped. Starting this again helped to open the settings again.
6. Check Netbios and FQDN
You should check if the Netbios Domain Name is equal to the Full Qualified Domain Name. To check that open the DOS Command and type in "SET". You will see lots of environment variables. Check the variables "USERDNSDOMAIN" (FQDN) and "USERDOMAIN" (Netbios). If USERDOMAIN is equal to the first part of USERDNSDOMAIN that everything is fine. If not you must set some properties on your User Profile Service Application. See: http://blogs.msdn.com/b/russmax/archive/2010/03/20/sharepoint-2010-provisioning-user-profile-synchronization.aspx7. Setup a synchronization connection
Now create some users in your AD and set up the "Synchronization Connection". To setup this connection go to Central Administration -> Manage Service Applications and click on "User Profile Service Application" link. On the new page click on "Configure Synchronization Connections".

Click on "Create New Connection" and fill in all the needed infos. Click on "Populate Containers" to select the container you want. Use the Sync Account with the "Replication Directory Changes" rights as account for the sync.
Now you can start the synchronization by clicking on "Start profile synchronization" in the "User Profile Service Application" page.
I had the following error "MOSS MA not found". After starting "Forefront Identity Manager Service" within the service manager, the problem was gone.
Additional Helpers:
- If your Profile Service do not start after everthing is done, take a look here "http://www.harbar.net/articles/sp2010ups2.aspx"
- Full Explanation of Russ Maxwell (MS SharePoint Premier Engineer) in his blog on MSDN http://blogs.msdn.com/b/russmax/archive/2010/03/20/sharepoint-2010-provisioning-user-profile-synchronization.aspx
- Configuration the Profile Service and creating exclusion filters Video :
"blog.technet.com"


Comments
http://sharepoint-2010-world.blogspot.com/2011/02/configure-user-profile-sync-in.html
It may helps to the guys who started fresh start. Keep up good work.
Thanks.