Localization with SharePoint 2010 and Visual Studio 2010
A good resource management is essential when you working with SharePoint. Most custom solutions are not really localized although it's not so difficult to implement. In this post I'll show you which resource types exists while developing SharePoint solutions.
Resource Types
When you develop SharePoint solutions you'll be creating different types of solution items. This includes:- Features
- WebParts
- ASPX Pages
- Custom Code
Resource Locations
You have multiple locations where you can position your resource files. Each location is used by another item and has other code methods.- \14\Template\Features\<Feature Name>\Resources\
- \14\Resources\
- \14\Config\Resources\
- <Virtual Directory>\App_GlobalResources\
The meaning of the \14\Config\Resources folder is that all resource files within the folder are copied to the <Virtual Directory>\App_GlobalResources\ in following cases
- You use the stsadm command : stsadm -copyappbincontent. You have to execute this command on all frontend servers
- When provisioning a new webapplication also all resources files are copied from this folder
Until now I never used this folder. Perhaps you'll find a use case herefore.
Part 1: Localization of Features
Method 1
With Visual Studio 2010 it is more easier to localize features, Click on the feature you want to localize and select "Add Resource Feature". |
| Add new Feature Resource |
Select the invariant culture, A new Resource.resx file is created within your feature folder.
 |
| The new Resource in your Feature folder |
Open the Resource.rex file and create two entries with keys "FeatureTitle" and "FeatureDesc". Next doubleclick on the Feature Folder to open the Design view.
 |
| Modify Feature Settings |
Click on Manifest at the bottom. On the next screen expand the "Edit Options". Edit here the title and description properties of the feature by entering a new title and description with reference to the resource file.

That's it. If you want to add a new culture you can't copy the resx file and paste it again. You have to do the first step again by selecting the new culture in the upcoming dropdown box.
Method 2
Another method how you can localize a feature or a webpart is to deploy the resource file into the Resources folder under the 14hive. Right click on your project name and select "Add" >> "SharePoint Mapped Folder". |
| Add new mapped folder |
Select the "Resources" folder in the next dialog and click O.K.
Now add a new resource file to this folder by right-clicking on the folder name and selecting "Add" >> "new Item". Select Resource File in the next dialog and name it Features.resx.
You can tell now your feature to take this resource file as default resource file. To do this double-click on your feature to open its property panel. There you'll find the attribute "Default Resource File"
 |
| Set Default Resource File |
Part 2: Localization of WebParts
The localization of WebParts is very easy when you've understood the localization of features, To localize a webpart follow the steps of the 2. method from the feature localization. This means
- Add a new SharePoint Mapped Folder to the project
- Select the "Resources" folder
- Add a new resource into this folder
Now you can adress the resource within the webpart settings. Assume we have a resource file called "Features.resx" in the mapped folder with keys WebPartTitle and WebPartDesc , then you can modify your webpart like that:
<?xml version="1.0" encoding="utf-8"?>
<webParts>
<webPart xmlns="http://schemas.microsoft.com/WebPart/v3">
<metaData>
<type name="Gollum.WebPart, $SharePoint.Project.AssemblyFullName$" />
<importErrorMessage>$Resources:core,ImportErrorMessage;</importErrorMessage>
</metaData>
<data>
<properties>
<property name="Title" type="string">$Resources:Features,WebPartTitle</property>
<property name="Description" type="string">$Resources:Features,WebPartDesc</property>
</properties>
</data>
</webPart>
</webParts>
If you want to know how to localize the webpart code, then look at step 4.
Part 3: Localization for ASPX Pages
You often develop custom pages for displaying or managing information. Usually you deploy them to the /_layouts/ folder. This virtual path is mapped to the \14\TEMPLATE\LAYOUTS folder in the server.When you open an aspx file in this folder you will see that the expression builder "Resources" is mostly used to localize a page.
<SharePoint:EncodedLiteral runat='server' text='<%$Resources:wss,common_nofieldempty_TEXT%> .. />
This is a common way to seperate code and UI. Within the aspx page you can say which resource should be used by using the expression builder syntax. The markup for using the "Resource" expression is:
<%Resources:*Name of the resource file*, *Key in the resource file*%>
When you have a resource file like Gollum.resx and a key "SayHello" with value "Say hello to the world" then
<%Resources:Gollum,SayHello%>
would output "Say hello to the world".
Hint: Expressions can only be used within ASP Controls. You cannot place them anywhere in the HTML Code like:
<table>
<td> <a href="www.xyz.com"><%$Resource:Gollum, Link1%></a> ..
In this case you can use the ASP:HyperLink or ASP:Literal Control.
<table>
<td> <asp:HyperLink runat="server" NavigateUrl="www.xyz.com" Title="%$Resource:Gollum, Link1%" /> ..
<table>
<td> <a href="www.xyz.com"><%$Resource:Gollum, Link1%></a> ..
In this case you can use the ASP:HyperLink or ASP:Literal Control.
<table>
<td> <asp:HyperLink runat="server" NavigateUrl="www.xyz.com" Title="%$Resource:Gollum, Link1%" /> ..
Where I have to put the resx file ?
Assume we have a resx file named Gollum.resx. To be able to use this file with the expression syntax it must be located in the "App_GlobalResources" folder of the current web application in the IIS webserver.Usually the folder sits in a path something like that:
- C:\inetpub\wwwroot\wss\VirtualDirectories\80\App_GlobalResources
- C:\inetpub\wwwroot\wss\VirtualDirectories\sharepoint\App_GlobalResources
- C:\inetpub\wwwroot\wss\VirtualDirectories\intranet\App_GlobalResources
A resource file within the App_GlobalResources folder is often called a Global Resource, because all pages within a web application can used it.
How do I deploy resource files to App_GlobalResources folder ?
The type of your Visual Studio project must be a "SharePoint Project". Now you click right on your project name and choose "Add" >> "New Item"
 |
| Adding a new item |
In the next dialog select the "Empty Element" and name it e.g. "GlobalResources"
| Adding a new empty module |
Now click right on the new "GlobalResources" folder (Module) and add a new resource file.
 |
| Add new item into the new folder |
Name it like you want.
 |
| Add new resource file |
Doubleclick the resx file and open it. Enter some keys and values. Save it afterwards.
 |
| Add some resource |
In the next step click on the Gollum.resx file to display the properties. Change the "Deployment Type" attribute to "AppGlobalResource". This will force the solution package to deploy the file to the IIS folder App_GlobalResources.
 |
| Change Deployment Type |
When you select the value "AppGlobalResources" the "Deployment Location" attribute gets activated, where you can select the folder to which the resx file should be deployed. You can select here any folder or leave the standard entry. This has no effect to the expression syntax.
 |
| Change Deployment Location |
Now add some resources to our page.
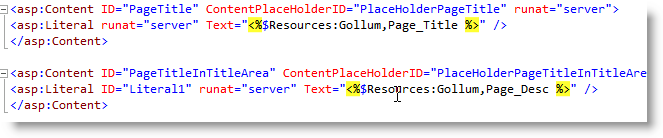
We are already done. Deploy the solution and check if everything works fine. When you open the page now error messages hould be shown. Also the resx file should reside within the App_Globalresources folder.
 |
| Location of the resx file |
Now you can start to localize your page. Make a copy of the Gollum.resx file and add it to the GlobalResource Module folder. Rename it for your desired language:
- Gollum.tr-TR.resx (example for Turkish)
- Gollum.en-US.resx (example for American english).
- Gollum.de-DE.resx (example for German)
Part 4: Reading resource by code
Reading Global Resources by code
To read a global resource (resource files in App_GlobalResources) folder by code use the following syntax:
- HttpContext.GetGlobalResourceObject("Gollum","Page_Title")
- HttpContext.GetGlobalResourceObject("Gollum","Page_Title",CultureInfo.CurrentUICulture)
Reading Resources in 14Hive/Resource folder
To read resources within the Resource folder for example in webparts, you can use the helper method
uint lang = SPContext.Current.Web != null ? SPContext.Current.Web.Language : 1033;
lblHeaderTitle.Text = SPUtility.GetLocalizedString("$Resources:Features", "WebPartTitle",lang)
Final Words
Before you start creating a SharePoint Project you should think about of which items your project will consist and which type of resource handling is appropriate.
As an example you have a project with multiple pages and features. But one of these pages is used in the Central Administration site and the other on you normal SharePoint web application.
To use Global Resources you had to deploy your solution to all webapplications, because the Central Admin has its own web application with its own App_GlobalResource folder. Perhaps it would make more sense to deploy it into the 14Hive/Resource folder and use code to localize in this case to prevent multiple deployments.


Comments
Localization
Localization